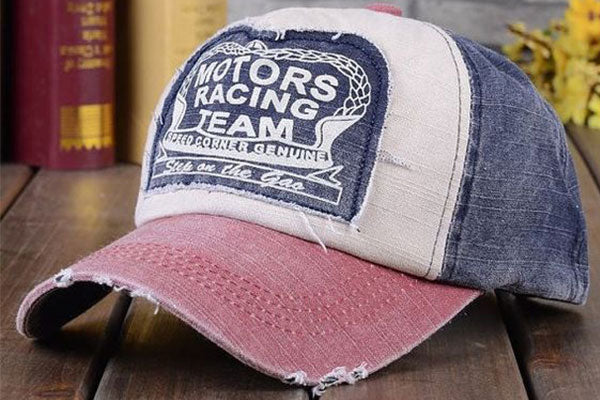
Some things should be shiny and new – like automobiles. On the other hand, some things should look already worn or broken in – like sneakers, jeans, and baseball caps. But it can take months, if not years, to break in a baseball cap to the perfect level. Let's take a look at distressing baseball caps in a number of ways. In no time at all – or at least in less time than it would take simply by wearing it a lot – you'll be able to get that hat looking like it's been in the family for years.

The following will cover a wool Fedora, as well as a baseball cap. But first things first – always use caution!
Be Cautious – Be Safe
When you're distressing a hat, the thing to remember is "easy does it". Too much may never be enough when it comes to things like pizza and money, but too much when you're breaking in a hat means the destruction of that hat. Proceed with caution and gradually you will achieve your comfy, broken in look.
Let's face it, you can always kick it up a notch and get more aggressive if it doesn't look beat up enough right away. Repeat as necessary, proceeding step-by-step. You can't undo it once you've gone too far!
Distressing a Baseball Cap
Don't confuse distressing a cap with breaking it in. A hat that has been broken in – albeit naturally or manually – may look slightly faded and has a comfortably curved brim. A hat that is distressed, on the other hand, looks significantly worn out. One of the key factors here is "scraping". As just mentioned, take it easy at first. You can incrementally increase the intensity.
Tools you can use for fraying a baseball cap: cheese grater, scissors, seam ripper, sandpaper. The finish you seek could well determine the tool you use.
- Start with a fine grit sandpaper for the front of the brim. To create a worn look, sand through the top layer of the fabric. For a mix of textures, sand different areas softer or harder. Until you get the look you want, you can also use sandpaper that is coarser.
- To add hat frays, use a small scissors or seam ripper. Through the top stitching, do a little snipping. Until they fray out, between your fingers, rub the threads together.
- You can also try to run the fabric across a handheld cheese grater to create snags and nicks. For more fiction, go in opposing directions.
- You can actually create small holes or cut the edge of the brim with a scissors or seam ripper for further distressing. Some people like to add holes by poking and twisting a small scissors or the seam ripper through the fabric and twisting.
Wolf Fedora Break-In
At least on the first go, use warm water rather than hot to get a worn-in, faded look to your wool Fedora. This is because hot water can shrink wool.
- To create a more tattered look and frayed edges, consider tossing your hat in the washing machine. Heed any special washing instructions.
- Create a solution of olive oil and saltwater to mimic the effects of sweat stains and body oils. Apply it to the hat with a spray bottle. More prominent stains can be achieved by using black tea or coffee.
- To give your hat an increased aged appearance, twist it in your hands and, with rubber bands, hold it together in a twisted position overnight.
- Across the crown of the Fedora, using a cheese grater, fray the felt. You can create snags, nicks, streaks, and worn spots by going both against and with the nap. No cheese grater? Use a rock.

